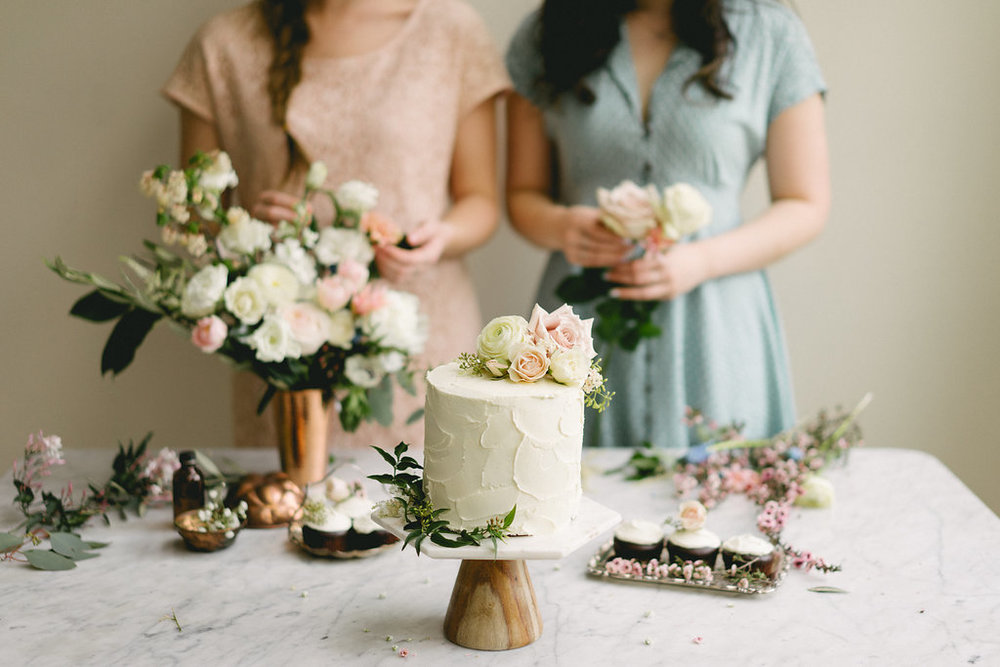
a birthday cake for Amy

Oh hi there!  I am so so excited to share my latest collab with my square....Amy & Victor!  You might remember our epic Earl Grey Lavender situation from last year, our carnival cake, or even our orchard shoot!  

This time we got together just before Amy's birthday!  It was requested that I bake her a birthday cake (*cough cough - announced on instagram I do believe :P), so I decided to stick with my tried and true, and favourite ever, chocolate cake.  I made the most delicious vanilla swiss meringue buttercream for on top, AND.....I contacted Celsia Floral to see if they'd be interested in collab-ing with us to make Amy's birthday shoot extra special.  They said YES and came up with the most beautiful, whimsical bouquet ever for our shoot, with extra blooms for on top of the cake!  The flowers almost stole the show, and all 3 of us were obsessed with them all morning.  It is so fun to connect with other local creatives, and we hope to work together again soon!

It was so great to work with Victor again too (all photos are his!), and the squad was finally reunited.

Anyhow, Amy and I had the best weekend.  We decorated and shot this cake, went out for the dreamiest food at the loveliest little French restaurant (Au Comptoir!) in the heart of Kitsilano, and then ended our evening at Beauty & the Beast.  We also maybe went into the wrong theater for our movie....which is hilarious now, but a little traumatizing at the time.  Ha!  It's always an adventure with Amy.  The next morning we ended our time together by brunching at Le Marche St George, like always.  Pretty much a perfect weekend celebrating the birthday girl!  It made me grateful all over again for our friendship, and to have someone who loves and appreciates so many of the same things in life - and doesn't judge you for taking photos of food in restaurants (or for standing on chairs to get the best shot....hehehe).


Chocolate Cake

yields: three 6-inch round pans, or a 9x13 pan
recipe: (adapted from Our Treasured Recipes by Central Heights MB Church)

ingredients:

3 cups Flour

2 cups Sugar

2 tsp Baking Soda

1 tsp Salt

2/3 cup Cocoa

1 TBSP Vanilla

2 TBSP Vinegar

3/4 cup butter (melted) *can substitute oil here if you want to make it vegan*

2 cups Warm Water

Directions

1) Mix together all dry ingredients; then pour all wet ingredients over top and mix until moist.

2) Pour batter into three 6-inch round pans (or a 9x13).

3) Bake at 350: for 30-35 minutes for [or until a toothpick comes out clean], slightly longer if using a 9x13 pan.


Vanilla Swiss Meringue Buttercream

recipe slightly adapted from: Style Sweet Ca

Ingredients:

1/2 cup egg whites (from about 3 to 4 large eggs)

1 cup granulated sugar

1 1/2 cups butter, at room temperature, cubed

1 1/2 teaspoons pure vanilla extract - *use the clear stuff if you want to keep your icing super white!

Directions

1) Fill a large sauce pan with a few inches of water and bring to a gentle boil.  Place a mixing bowl on top to create a double boiler.  Make sure that the water does not touch the bottom of the bowl!

2)  Place sugar and egg whites into the mixing bowl, and whisk together.  Keep mixing as the mixture heats, until it reaches 160 degrees F on a candy thermometer.  This ensures that your egg whites are cooked and safe to eat!  The sugar should also be completely dissolved and not grainy at all.

3)  Remove from heat once 160 degrees F is reached, and mix on high for 5-10 minutes.  This creates the meringue, which should be white, shiny, and hold medium stiff peaks.

4)  Add in the butter one cube at a time, mixing thoroughly after each addition.  *Make sure butter is at room temperature or it won't incorporate properly.

5)  Mix in vanilla extract.

6)  Turn up beater speed, and mix until it's nice and smooth.  Use immediately to ice your cake, or place in the fridge to store.

*If your icing turned soupy at any point either: place in the fridge for 5 minutes and try again, as your butter may have been too soft; OR: just keep mixing!  This icing can be a bit finicky, so don't panic.


ALSO. Victor took some sneaky video clips which Amy and I were completely unaware of...HAHA.  He made my dorky white girl dance moves look a little less dorky.  Right?   You can also see how dreamy the swiss meringue buttercream is!  Hurrah!

Happy Cake Baking!

-Kelsey

pumpkin cake

Today we're talking about cake.  Pumpkin cake to be precise.  There's salted caramel involved as well (because duh...you should know by now that I'm obsessed with it).

I made this cake for my birthday way back in October!  Yes, I know that was more than a month ago, but my life is just calming down after our crazy Fall season on the farm, and I'm very slowly catching up on all of the Fall themed things I shot but didn't have time to blog.

Also....Yes, those are leaves on my cake. #noregrets

Anyhow.....I knew that I wanted a pumpkin cake, and I had dreams of a brown butter swiss meringue icing situation with salted caramel drips. Alas, it was not meant to be, as my icing majorly failed, and I had to improvise with whipped cream instead.  Of course this happened with half an hour of daylight left, and family arriving for my birthday dinner.  Talk about STRESS!!

Nonetheless, it was mighty delicious, but very messy, as whipped cream isn't the best for layer cakes.  Cutting the cake was a bit of an adventure, as the messy, imperfect photos below can attest to.  And maybe there was a birthday-life-lesson in there somewhere, since life doesn't always turn out the way you imagined.  It's often messy and imperfect, but when in doubt, caramel drizzle makes everything better.


Pumpkin Cake

yields: approx. three 6-inch cake layers

ingredients:

1 1/3 cup butter (browned)

3 1/3 cup flour

1 tsp baking soda

1 tsp baking powder

1 tsp salt

1 1/2 tsp cinnamon

1/2 tsp allspice

4 eggs

15 oz pureed pumpkin (about 2 cups)

2  2/3 cup brown sugar

1 cup milk

1 tsp vanilla

directions:

1)  Preheat your oven to 350 degrees F.

2)  First you'll want to brown your butter, and allow it to cool slightly.  Using a stainless steel saucepan or frying pan is great since you'll be able to see when the butter starts to darken.  Place your butter in a large pan over medium heat.  Swirl the pan to help your butter melt and cook evenly.  It will take a few minutes, but your butter should start to foam a little bit on top, and then will start to darken.  Keep swirling, and once it reaches a dark tan colour then remove from heat and set aside to cool.  It will smell a bit nutty and taste extra delicious!  (You can always skip this step if you're short on time, and just melt your butter instead).

3)  In a large mixing bowl, combine flour, baking soda, baking powder, salt, cinnamon and allspice.  Mix well, and then set aside.

4)  In a large bowl, beat eggs and sugar together until light and fluffy.

5)  Add your browned butter, pumpkin, milk and vanilla, and mix well.

6)  Gradually add your dry ingredients to the wet ones, and mix until just combined.

7)  Distribute batter between your greased cake pans.  (If you don't have 3 pans, you can bake  1 or 2, and then remove your cake from the pan(s) once the cake has cooled a bit, wash the pan, re-grease it, and bake the next one.  The cake will likely rise a bit differently since the batter has sat for a while!  I bit the bullet and purchased 3, and it makes life so much easier!)

8)  Bake at 350 degrees for 40-45 minutes, or until a toothpick inserted comes out clean.

Frost your cake with your desired icing - I recommend using Amy's Brown Butter Swiss Meringue Frosting (recipe here).  Or you can use whipped cream for a messy look like me!  I added homemade salted caramel between each layer, as well as on top of each piece as well.  Have fun with it!


Happy Cake Baking!

-Kelsey

mint ruffle chocolate cake topped with cherry blossoms

YOU GUYS!  I finally had the courage to try a ruffle cake, and guess what?  It was actually super easy, and so fast!  Seriously, I think it was way faster icing it this way compared to what I usually do.  Crazy!

Also, our cherry trees are blossoming, and it's pretty much heaven.  I really wish the blossoms would last all Summer!  They are just so bright and happy.  Oh well, I'll enjoy them while they're here!  And that means putting them on a cake.  Heck yes!

So for this cake I kept it nice and simple with my go-to chocolate cake recipe, and then used Linda Lomelino's Swiss Meringue Icing recipe for the icing.  I love the SM icing since it's fluffy, but sturdy, and it's not so sugary sweet like buttercream!  


Chocolate Cake

(adapted from Our Treasured Recipes by Central Heights MB Church)

directions:

1) Mix together all dry ingredients; then pour all wet ingredients over top and mix until moist.

2) Pour batter into three 6-inch round cake pans.

3) Bake at 350 degrees for 30-35 minutes for [or until a toothpick comes out clean].

Ingredients:

3 cups Flour

2 cups Sugar

2 tsp Baking Soda

1 tsp Salt

2/3 cup Cocoa

1 TBSP Vanilla

2 TBSP Vinegar

3/4 cup Margarine (melted)

2 cups Warm Water


Swiss Meringue Icing

recipe by: Linda Lomelino

ingredients

whites from 8 large eggs

1 3/4 cups granulated sugar

1 3/4 cups unsalted butter

4 tsp vanilla sugar

directions:

1)  Place your egg whites and sugar into a heat proof (stainless steel or glass) bowl, and put the bowl over a sauce pan on the stove with simmering water.  (The water shouldn't be touching the bowl).

2)  Whisk the eggs and sugar constantly until the sugar has melted, or the mixture has reached 140-150 degrees F (or 65 degrees C).

3)  Remove from heat, and beat on high until your mixture is cool, white and fluffy.  This may take 5-10 minutes, so just keep mixing!

4)  Once the mixture is cool, start adding butter, very gradually.  The mixture may look curdled, or soupy, but just keep mixing!  You may need to mix it for 10-15 minutes to help the egg whites and butter come together nicely.  *Linda also says that you may need to refrigerate it for a few minutes if it's too soft, or place it back over the heat if it's too stiff.  It's a tricky one, but it's worth it!  I always find mine gets too soft and I have to cool it for a bit before it works.


Cake Assembly:

First, use a large serrated knife to level the tops of your cakes.  Place the first layer onto your cake plate, spread icing onto the layer as even as you can (and as thick or thin as you'd like).  Add the next layer, spread icing onto it, and finally add the top layer of cake.  Spread icing over the entire cake in a thin layer.  Allow to chill in the fridge for a bit if it feels unstable at all before you start icing the ruffles.

Use a large piping bag with a petal icing tip (mine was a #103).  I like to place my piping bag into a very large cup to make filling it with icing nice and easy.  Fill the icing bag, and twist the end securely so that you have a good grip on it.  (Sometimes I'll clip mine shut with a bag clip to make twisting it down even easier as my icing is used up.)

With the fat part of the icing tip closest to the cake, you'll want to hold your piping bag almost straight up and down, parallel to the side of the cake.  Slowly start squeezing out the icing, and start to make a back and forth motion of consistent lengths.  This is hard to explain, and I found this youtube tutorial very helpful to watch!  You want to keep your icing bag a bit higher than where the next ruffle edge should sit, so that it gently folds down as you continue moving up.  You'll get the hang of it once you start piping.

Make sure that when you get to the top, you do a ruffle right up to the edge and over the top.  Repeat your ruffles all the way around the cake.   I chose to just smooth out the top of my cake and top it with cherry blossoms, but feel free to finish it however you'd like!

Serve and enjoy!


Happy Cake Baking friends!

-Kelsey