lavender macarons

Hello macarons!  This is only the second time I've made macarons since these raspberry macarons I blogged about last year.  They're a bit of a specialty dessert...and frankly I was a bit nervous to make them again.  Ha!  I knew that I needed a special occasion to motivate myself to make them again, and the opportunity came last month!

So......I've been internet/instagram friends with Amy from Constellation Inspiration for a long time now, and I FINALLY gathered the courage to ask if she'd be interested in a baking date.  She said "YES!", we started brainstorming ideas, and boom...we got together!  

I won't lie, I was pretty nervous about driving into Van and having a sleepover with a somewhat stranger (yes...a sleepover.  we went all in...haha), but from the moment we met it felt as though we had been friends forever.  We instantly bonded while flipping through cookbooks, browsing our favourite food blogs, eating doughnuts, and baking of course!  Seriously though, Amy is the sweetest, and I love having a new friend who doesn't mind talking about cake and doughnuts 99% of the time, understands #foodbloggerproblems, and who inspires my own creativity!

Anywho.....we created a beautifully whimsical spread comprising of an earl grey lavender layer cake topped with lavender macarons (inspired by the lovely Linda Lomelino!), cupcakes topped with mini macarons, and flowers galore.  Keep scrolling to see the final photos below, and be sure to hop on over to Amy's blog to see the full spread and cake recipe!

Amy had also invited her photographer friend Victor over to take photos, and it was such a fun experience to be on the other side of the lens during a food shoot for once!  Victor was so awesome, his photos turned out breathtakingly gorgeous, and the three of us were laughing the whole time.  #squadgoalsachieved

So, without further ado, here is the macaron recipe!  And I'm sorry (not sorry) for all of the photos!  I couldn't bring myself to cut any more. Ha!


Lavender Macarons 

recipe: slightly adapted from Linda Lomelino - Basic Macarons

Directions:

1) Grind the ground almonds further by using a food processor/blender. *Careful not to grind them too much, or for too long at a time, otherwise you'll end up with almond butter!

2)  Use a sifter to get rid of any large pieces that are left over.  Now you can measure out 100 grams and set aside.

3)  Use a sifter to mix the ground almonds together with the powdered sugar.  Repeat 2 more times.

4)  In a large mixing bowl, beat the egg whites on high until the eggs start to foam.  Then, slowly add your granulated sugar and food colouring, and continue mixing until the mixture becomes quite stiff. (If you hold the bowl upside down, it shouldn't be able to slide out!)

5)  Gently fold the dry almond/sugar mixture in using a spatula.  It's hard to explain what the consistency should be like, but often it's described as "lava".  Place a blog on your parchment or silpat, and see if it slowly flattens.  Then you're good to go!  If it flattens too much and runs everywhere than you've mixed it too much.  If it's too stiff and doesn't flatten at all, then fold it a bit more!

6)  Fill a large piping bag fitted with a large round piping tip (or just cut the piping bag) and pipe the macarons onto baking sheets.  Sprinkle on a few pieces of dried lavender onto half of the macarons right away.  Remember that the shells will “flatten” once you’ve piped, so don’t make them too big. About 1" diameter is enough.

7)  Let them set for 60 minutes to form a dry skin.  *This is important since letting them sit out is what helps the feet to form.

8)  Preheat oven to 150 degrees C. Bake for about 11-13 minutes. You can test if they are done by touching the tip of a macaron, if it “wobbles” they are not done. Let cool completely, then fill and sandwich together with a macaron of matching size. Store in airtight container in the fridge, preferably for a day or two before eating.

Ingredients:

100 grams blanched, ground almonds (grind more than 100 grams!)

200 grams powdered sugar

110 grams egg whites (around 3 egg whites, depends on the size of your eggs.) *it's very important to let your eggs age at least 1 day, and for them to be at room temperature before you start baking - don't skip this step!

50 grams granulated sugar

purple food colouring (optional)


Lavender Buttercream

recipe: Kelsey Siemens

Directions:

In a very small saucepan, heat cream on medium high and add dried lavender to steep for 5 minutes.

Strain out lavender and allow cream to cool.

Mix together icing sugar, butter, and 2 tablespoons of cream.  Add more cream if necessary to achieve a nice piping consistency. 

Place buttercream icing into a piping bag and pipe onto macarons.

Store in the fridge in an airtight container until eating.  These are great the next day or two!

Ingredients:

3 cups icing sugar

1/2 cup butter, room temperature

1/4 cup cream

1 tsp dried lavender


The three of us seriously had so much fun!  I can't believe that I've only known Amy and Victor for such a short time, and I can't wait to create pretty things together again SOON!

Photos of macarons on wood table by me.
All other photos by the very talented: Victor Yuen

Now, please head over to Amy's blog to see MORE cake photos and to find the cake recipe too!  And give her a follow on instagram (@constellationinspiration) for more drool-worthy creations!

-Kelsey

P.S.  ALSO.......Amy and I are getting together next week to bake another cake, and Victor will be there too lending us his mad photography skills.  I can't wait!

blackened fish tacos with homemade guacamole and pico de gallo

Man oh man....I LOVE fish tacos.  Once or twice a month my family will have "Fish Taco Friday", and it is the best.  These tacos are seriously one of my favourite meals in the world, and I would happily eat them every single Friday for the rest of my life.  Ha!

We're not too fussy about what kind of fish we use, and have tried out many different seasonings as well.  Sometimes we'll even swap out the fish for shrimp, which is equally delicious!  And I love the colours of everything that goes into these tacos, from the purple cabbage, to the green guacamole...so fun!


Now, I will say that these take a bit of time and effort to do, but it is so worth it.  You can always use store salsa instead of making your own pico, if you want to save some time (I won't judge you I promise).  I think it's a fun meal to make with a bunch of people, as there are lots of jobs to do!


Fish Tacos

recipe: Kelsey Siemens
yields: ~3-4 servings (depending on how hungry you are)

Directions:

In a small bowl, toss together all of the spices.  Pat onto both sides of the fish.

Cook fish on medium-high for 3 minutes a side.

Assemble Tacos:

Load up tacos with fish and desired toppings.  Serve with chips (and daiquiris), and enjoy!

Ingredients:

~1 lb of firm white fish (we use tilapia or basa usually)

2 tablespoons paprika

1 tablespoon garlic powder

1 tsp cayenne pepper

1/4 tsp salt

guacamole*

pico de gallo*

purple cabbage, chopped

soft tortilla shells

*recipes below


Guacamole

recipe: Jordyn Siemens

Directions:

Peel, cut and mash your avocados.  Stir in tomato, spices, and lime juice.

Serve!  

*Guacamole is best enjoyed on the first day, but will last a couple of days in the fridge.

Ingredients:

2 ripe avocados 

1/2 medium Roma tomato

1/4 cup diced onion

1/4 tsp garlic powder

1/8 tsp cumin

1/8 tsp salt

juice from 1 lime


Pico de gallo

recipe: Jordyn Siemens

Directions:

Mix together all ingredients and serve.

Ingredients:

3 1/2 medium Roma tomatoes

3/4 cup diced onion

1 tablespoon chopped cilantro

1/2 tsp garlic powder

pinch of cumin

juice from 1 lime


P.S.  Here's the recipe for the delicious lime daiquiri that you see lurking in some of these photos.  It pairs so perfectly with the fish tacos!

I hope you enjoyed this!  And now you know what you're going to make next Friday.....you're welcome!

-Kels

simple lime daiquiris

Ladies and Gentlemen....I officially have a new favourite drink.  Simple Lime Daiquiris.  So ridiculously easy.  Seriously, they taste way better than they have any right to.

Jordyn and I made these to go with fish tacos one night (recipe coming up this Friday!!), and it was such a perfect pairing.  We also busted out our vitamix for the job, and man it blends ice like no other.  I don't know about you, but I love my ice blended rather than crushed or cubed.  There's just something about it being all slushified that I like!


Simple Lime Daiquiris

yields: 2 drinks
recipe by: Jordyn Siemens

Directions

Combine all ingredients into a blender, and blend until smooth.  

*If your blender doesn't handle ice well, you can use crushed ice instead.

Serve with a lime wedge on the side, and enjoy!

Ingredients:

12 ice cubes

5 ounces of coconut rum

3 ounces of lime juice

1 tablespoon sugar (*or to taste)


Now go and buy some limes and get ready for FISH TACO FRIDAY!!!! 

-Kelsey

toasted coconut waffles with chocolate whipped cream and raspberry sauce

Hello and Happy Monday dear friends!  Today we're talking about coconut...toasted coconut to be precise.  I was craving coconut waffles the other day, and these were the result!  Not only do they have toasted coconut in them, they're also made with coconut milk.  If you wanted to go super coconut crazy, you could probably use coconut flour too (with a few adjustments...I haven't tried it yet!).

I will say that the coconut makes these pretty heavy waffles, and I could only finish one by myself once I topped it with raspberry sauce and chocolate whipped cream.  So be prepared!

It's nice to mix it up once in awhile, and these waffles do just that.  They'd be great for brunch or even if you're having breakfast for supper.  And, as always, we pop any extras in the freezer and toast them the next morning for breakfast!  Win win.


Toasted Coconut Waffles

recipe: Kelsey Siemens

Directions:

Heat your oven to 350 degrees.  Spread the shredded coconut on a baking sheet in a thin layer.  Bake for 7-8 minutes, stirring constantly, until the coconut is golden brown.  
*Do not walk away from the oven!  It's very easy to burn. 

In a large bowl, mix together the flour, toasted coconut (make sure it's unsweetened, and if it's not you'll want to reduce the sugar), baking powder, sugar, and salt.

In a smaller bowl, whisk together the egg, coconut milk, and melted butter. (*Make sure that your melted butter has cooled down so that it won't cook the egg). 

Add the wet ingredients to the dry, and mix until just moistened.

Heat up your waffle iron, grease, and fill with batter according to the size of your iron.

Serve waffles hot with any topping of your choosing!  

I made a simple raspberry sauce and chocolate whipped cream.

Ingredients:

1 1/2 cups flour

1 cup unsweetened shredded coconut, toasted

2 teaspoons baking powder

2 tablespoons sugar

1 egg

1 3/4 cup coconut milk

1/4 cup butter, melted

1/2 tsp salt


Chocolate Whipped Cream

Directions:

Whip the whipping cream until it starts to thicken.  Add in icing sugar and cocoa powder, and continue whipping until desired consistency is reached.

Ingredients:

1 cup whipping cream

1 heaping tablespoon of icing sugar

2 tablespoons of cocoa powder


So there you have it!  Hope you have a lovely week!

-Kelsey

apple hand pies

So, here we are, halfway through February and I'm already yearning for Fall.  Seriously, if we could just have Fall keep going and skip Winter, that would be great.

In the midst of my pining I decided to make pie.  Hand pies to be specific!  I used up some of the last few Elstar apples that we had in storage, and what a perfect ending it was for them.  Now hand pies take quite a bit more time than normal pie does! Ha!  I grew a bit impatient halfway through the process, but I promise that they're worth it.  I think these little parcels of perfection would be so great for a picnic, or bbq where more dishes would just be a hassle.  That's the beauty of a hand pie...you just pick it up with your hand, and eat it!  Heck yes!

Now, if you've been around the blog for a while you'll be aware of the fact that I don't actually like pie all that much.....well USED to not like pie that much.  You see, when I was younger, I really didn't like the idea of cooked fruit, and then I was not too sure about pie crust (what was I thinking?), and as I got older I clung to the idea that "I didn't like pie".  First of all, because I was stubborn, and then because I  was scared of all the pie I would consume if I decided I liked it...since my mom is the queen of pies and we tend to bake quite a number of them around our house.

Anyhow, I ate a hand pie to make sure that they were good......and then I ate another one, and maybe another.  So yeah.  I am now officially converted.  I LIKE PIE!  (And am no longer a freak of nature.)

So, without further ado....here is the recipe!


Apple Hand Pies

pastry recipe yields: dough for 4 pies - (we refrigerate whatever we don't use)
pastry recipe: Jean Pare - Company's Coming: Desserts

Directions

1)  Mix together flour, salt, baking powder and brown sugar in a large bowl.

2)  Cut up lard and add to dry ingredients. 

3)  Using a pastry cutter (or a plain old fork works as well), cut in lard until your mixture is crumbly.

4)  Break your egg into a liquid measuring cup and beat well.

5)  Add vinegar to the measuring cup.

6)  Add very cold water to the measuring cup, until the mixture measures to 1 cup.

7)  Pour liquid mixture over flour mixture slowly, and stir.

8)  Use your hands to work the mixture together until it no longer crumbles apart.  This is where experience will come in, as you don't want to overmix the dough!  Once you make it a couple of times, you'll get the feel of it.

9)  Divide into 4 equal parts.  Each part will make one pie (or quite a number of hand pies), so you can choose to use it all at once, store some of the dough in the fridge* for up to 2 weeks, or pop some of into the freezer for later!

*If you do refrigerate your dough overnight (or for a few days), be sure to take it out at least an hour before you roll out it.  Otherwise it will be too stiff!

Pastry Ingredients

5 cups Flour

2 tsp Salt

1 tsp Baking Powder

3 tbsp Brown Sugar

1 lb Lard (or vegetable shortening)

1 Egg

2 tbsp Vinegar

Cold water


Hand Pie Apple Filling and Assembly

**NOTE: the number of hand pies this recipe yields will be dependent on how much pastry dough you use, and how big you make the pies.  I made a bunch of filling, and then filled hand pies until I was sick of it!  Hand pies have a higher ratio of dough to filling, so you may want to double the filling recipe if you plan on making a lot of hand pies.

Hand Pie Assembly

First, assemble your apple filling.  Peel your apples, and then dice them into smaller pieces than you would for a regular pie.  Toss the apples in a medium bowl with cinnamon, flour, and sugar.

If your dough is in the fridge, be sure to take it out about an hour before you want to roll it out.

On a lightly floured surface, roll out the pie dough, and then use a round cookie cutter to cut out circles. (Note: you want your dough very thin, but not so thin that it will rip once you start stuffing it with apples!  this might take a couple trials to get just right).

Spoon a bit of apple filling onto half of the circles, and then place a matching circle on top of each of them.  

Use a bit of water on your fingers to wet the inside edge of one of the circles, and then pinch the edges together tightly until it seals.  Then, use a fork to further seal the edges and make a decorative pattern (see photos below).  Place each hand pie on a baking sheet lined with parchment or a baking mat.

Cut one or two small vent holes in the top of each hand pie.  Brush a bit of milk (or whisked egg) on top of the dough to help them get brown and glossy, and sprinkle with a bit of coarse sugar.

Bake at 400 degrees for 18-22 minutes, or until bubbling occurs and apples are soft!

Apple Filling

3 medium Elstar apples (or any tart apple of your choice)

3/4 tsp Cinnamon

 2 Tbsp Flour

1/3 cup Sugar


So the moral of the story today is....don't be stubborn, and pie is delicious.

-Kelsey

fluffiest ever baking powder biscuits

I don't know about you, but winter always calls for lots of soups in my family.  They're just so cozy, and perfect for those chilly, blustery days.  And of course, soup isn't quite complete without some sort of bread, am I right?

This recipe is for our favourite biscuits, and is from my grandma!  These biscuits are super fluffy, and basically foolproof.  We sometimes add in other spices (fresh rosemary is a favourite for sure), and often shredded cheese to mix things up a little.

And without further ado, here is the recipe!


Biscuits

yields: 10-12 biscuits (depending on size)

Directions:

Combine flour, salt and baking powder into a large mixing bowl.

Cut in the butter using a pastry blender or a fork until it resembles coarse crumbs of consistent size.

Stir in milk until dough starts to form a ball.

Roll out the dough on a lightly floured surface to about 1/2 inch thickness.

You can use a circle cookie cutter to cut out the biscuits, or we usually use a knife to make squares roughly the same size.

Bake at 400 degrees for 10-12 minutes.

Serve warm (preferably) and enjoy!

Ingredients:

2 cups flour

1/2 tsp salt

3 tablespoon baking powder

1/2 cup butter

1 cup milk


Happy Baking!

-Kelsey

sauteed onion, spinach, and feta - savoury galette

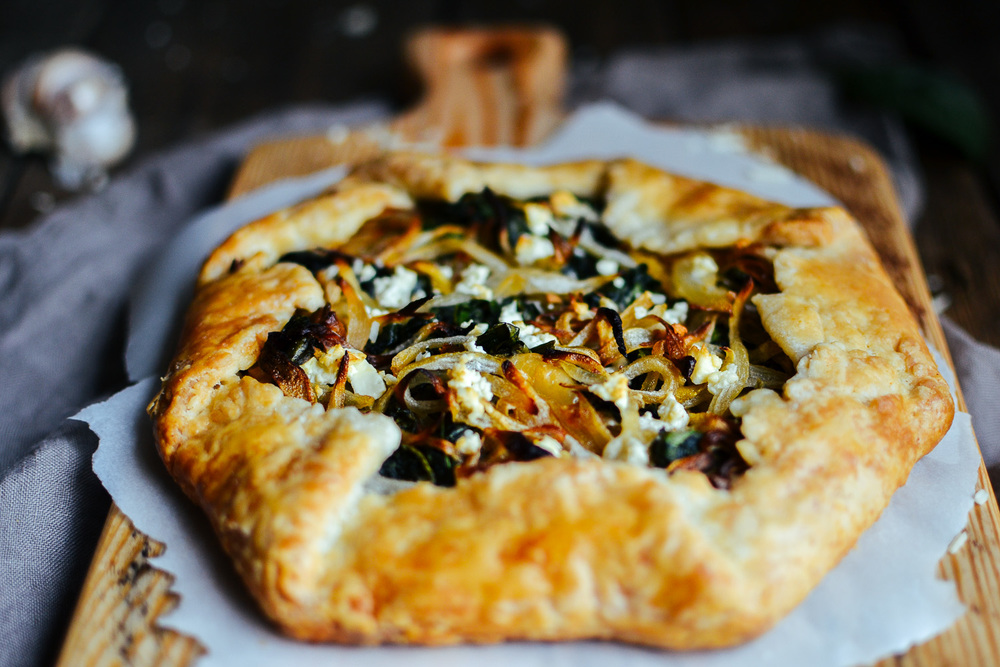
Oh hey there!  May I present to you....my very first savoury galette!  

I've been seeing dreamy versions of savoury galettes all over pinterest made with roasted butternut squash and bacon, fig and goat cheese, mushroom and leek...the list goes on!  I knew I needed this in my life immediately, and after much deliberation over ingredients, I decided to keep it simple.  Spinach, sauteed onions, parmesan, and feta.  Things that you probably have in your fridge right now!

fetaspinachgalette_thefarmersdaughter-20.jpg

Pie dough lasts for several days in the fridge, or you can always freeze it, and then use it later!  Our favourite recipe (here) makes quite a bit of dough, so it's nice to have leftover dough to make something else later in the week.

Now if you're kind of nervous about pie dough, this is a good time to practice!  Or you can always pick up some pre-made stuff, no worries!

I'd say the toughest part about this recipe is the sauteeing of the onions.  Oh man....it takes a while on a low temperature, and let me tell you that I am not the most patient person in the world. Ha!  Besides, you could always make an actual pie, or a sweet galette, while you're waiting on your onions.

Also, the measurements here are pretty loosey-goosey.  If you want more spinach, add more spinach!  If you want to make more than two, or make one giant one, or do 6 tiny ones....go for it!  I prefer to stuff mine super full, but you do your thing!

And can I just say that this isn't really a proper recipe, per se, but more of guidelines/an idea!


Spinach, Onion, Parmesan and Feta Galettes

recipe (if you can call it that...ha!): by Kelsey
yields: two 7-inch galettes

Directions:

Over a low heat, saute the onion in 1 tablespoon of oil, stir occasionally.  This will take about 20-30 minutes.  

In a separate frying pan, saute spinach in the other tablespoon of oil over medium heat.  Cover and let cook for about 5 minutes.  Stir and cook for another 3-5 minutes.

Roll out your pie dough into two circles about 8 inches in diameter, and about 1/4" thick.

Sprinkle parmesan as the bottom layer, leaving a 1 inch border around each circle.

Add spinach and then onions to each galette.  Pile them high!

Crumble a bit of feta over top.

Fold up a small section of the dough to create the crust edge.  Fold up a second section, which will slightly overlap with the first section.  Gently press the two sections together.  Repeat until all of the crust is folded up!  You may want to dip your fingers in a bit of water to help folded sections stay together. 

Bake on a parchment lined baking sheet at 400 degrees F for about 30 minutes, or until the crust is golden brown.

Ingredients

pie dough 

2 tbsp oil

1 white onion, roughly chopped

5 cups spinach, roughly chopped

parmesan

feta


Happy cooking friends!

-Kelsey

beignets

Cheers to the first doughnuts of 2016!  Jordyn and I decided to mix it up a bit, and try our hand at beignets!  Now, these are made with a yeast dough, although it's also common to use choux pastry.  I think that means that we'll have to make them again soon to see which we like better!

Now, the process for these beignets is quite a long one, so be prepared!  The rising time is quite a bit longer than other doughnuts, but the pay-off is worth it.  Beignets are also best served warm and fresh, although we did find that they froze well (place in freezer without dusting with icing sugar).


Beignets

slightly adapted from: handle the heat

Directions

In a large bowl, combine the water, sugar, and yeast.

In a small bowl, whisk together the egg, milk, and cream.  Then add to the yeast mixture.

Add half of the flour, and mix until combined - use a dough hook here, or a wooden spoon and some determination.  Keep mixing, and add in the salt and butter.  Gradually mix in the rest of the flour, and keep working the dough until it is smooth, and a bit tacky.

*If you don't have a dough hook, just flour your work surface and knead the dough by hand.  It will take a while, around 10 minutes.

Place the dough into a creased bowl, and cover with a clean towel or plastic wrap.  Let the dough rise in a warm place for at least 2 hours.  (Yes this is a long time!  But it's worth it.) 

Preheat oil in a deep-fryer, or in an electric frying pan to 360 degrees farenheit.  Place the icing sugar in a large bowl or 9x13 baking dish for tossing the beignets.

Roll the dough out to about 1/4" thickness, and cut it into squares.  Deep-fry each square until it's golden brown on both sides, flipping constantly while cooking it.

The beignets will float to the surface as they're frying, and if they don't, you might need more oil in your frying pan, or the oil might need to heat up a bit more.

Once the beignets come out of the frying pan, gently roll them on a cookie sheet lined with paper towels, and then roll them in the icing sugar while still warm.

***NEVER leave your oil unattended!!  Not for one second.

*It's helpful to have 2 people frying and coating the beignets here, especially if you're frying several beignets at once.

Beignets are best served warm, or at least the same day.

You can freeze them if you'd like, and coat them in icing sugar once you bring them out of the freezer and just before you serve them.

Ingredients

3/4 cup warm water

1/4 cup sugar

1 teaspoon instant yeast

1 large egg

1/4 cup milk*

1/4 cup cream*

3 1/2 cups flour 

3/4 teaspoon salt

2 tablespoons butter

(Oil - for frying beignets)

Topping:

1 1/2 cup icing sugar

*The milk and cream may be replaced with 1/2 cup of evaporated milk.


Now go on and make yourself some delicious parcels of fried dough people!

-Kelsey